

A new video tutorial is now available—showing you how to convert circuits from Texas Instruments’ WEBENCH® Circuit Designer to TINACloud.
WEBENCH provides rapid prototyping, component selection, and customized power supply design. By importing your schematics into TINACloud or the desktop TINA Design Suite, you unlock several powerful capabilities:
- Cross-Platform Accessibility: TINACloud runs entirely in a modern web browser across Windows, macOS, iOS, and Android devices (PCs, laptops, tablets, and smartphones).
- Offline Flexibility: If you prefer working offline, TINA Design Suite offers the exact same editing and simulation features on your desktop.
- Unified File Format: Both versions use the
.TSCfile format, allowing you to open and modify the exact same design file interchangeably between desktop TINA and TINACloud. - Custom Circuitry Expansion: Connect your power supply designs to your own wider system circuitry and test complete interactions.
Step 1: Importing an LM5085 Buck Converter Schematic
To see how the transfer works in practice, let’s walk through importing a buck converter design.
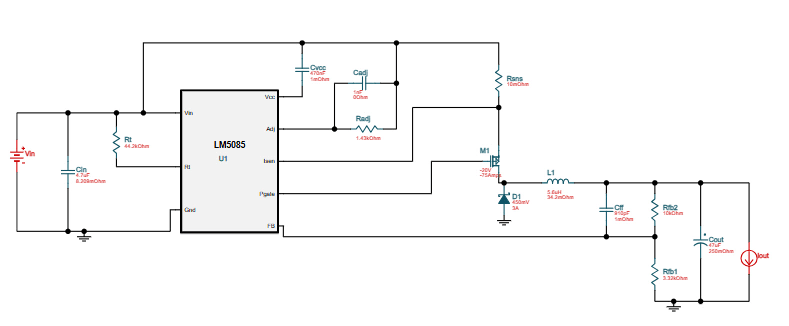
- Design in WEBENCH: Open the WEBENCH Power Designer and search for the LM5085 buck converter circuit. Adjust your output voltage to 3.3 V and open the design.
- Export Options: You have two easy ways to bring the circuit over:
- Save the schematic directly as an SVG file on your PC.
- Export the design in TINA-TI format, which generates a
.ZIPfile compatible with both TINACloud and TINA Design Suite.
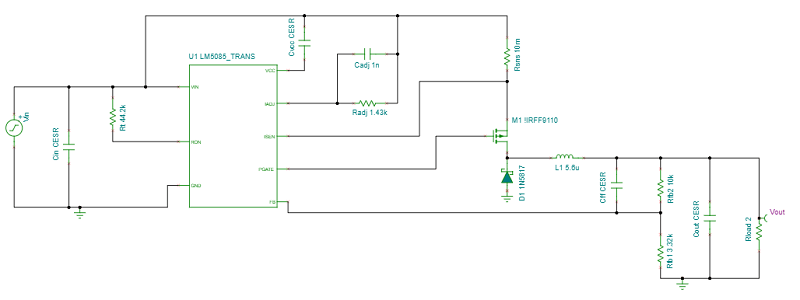
- Upload to TINACloud: Open TINACloud and upload either the TINA-TI ZIP file or the downloaded SVG file using the File > Upload command, then save the circuit.
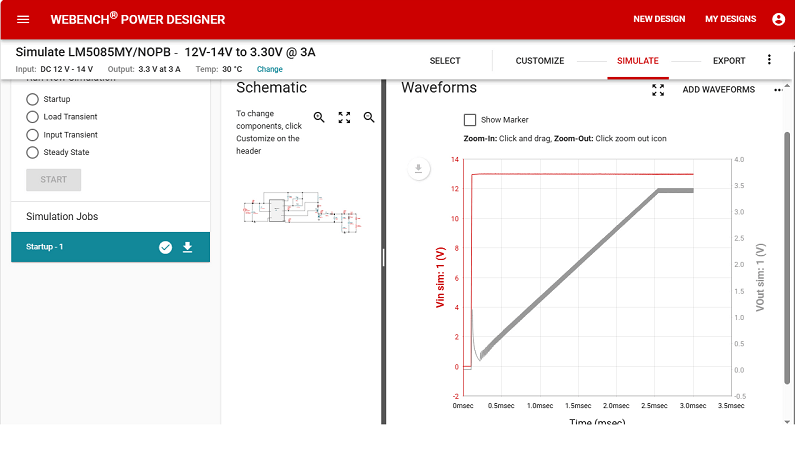
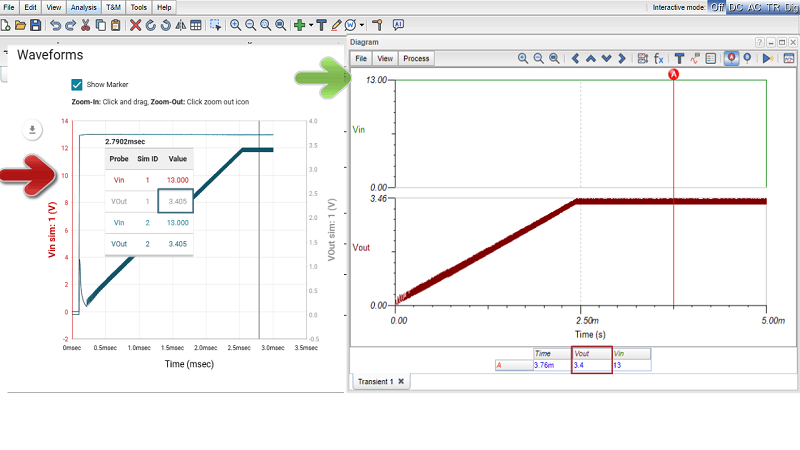
- Align Input Voltages: Since WEBENCH utilizes a default input voltage of 13 V for its simulation runs, set Vin = 13V in TINACloud as well to ensure direct result comparison.
- Run Transient Analysis: Navigate to Analysis > Transient… to run a startup transient simulation. You will find that the WEBENCH and TINACloud results match perfectly.
Step 2: Editing and Running Interactive Simulations
One of the main advantages of bringing your circuit into TINA is the ability to customize and interact with it in real time.
- Add Custom Components: To test functionality beyond the basic regulator, let’s add a 510-ohm series resistor and an LED to the output stage.
- Interactive Testing: Zoom in on your modification and press the TR (Transient) button to initiate an interactive simulation.
- Visual Feedback: As the output voltage ramps up, the LED illuminates—providing immediate visual confirmation that your power supply is active and ready.
Watch the Full Video Tutorial
For a visual demonstration of every step covered above—from exporting out of WEBENCH to running interactive transient analyses in TINACloud—check out the official video tutorial on YouTube:
👉 Watch the Tutorial on YouTube
Conclusion
That’s how easy it is to bring your WEBENCH designs into TINACloud, expand them with custom components, and run interactive simulations right in your browser. A similar procedure also applies to TINA Design Suite, our offline desktop version.
For More Information
To learn more about circuit design, simulation tools, and upcoming tutorials, check out the official resources:
Official Websites: www.tina.com; www.tinacloud.com
YouTube Channel: Tina Design Suite on YouTube