Click or Tap the Example circuits below to invoke TINACloud and select the Interactive DC mode to Analyze them Online.
 Get a low cost access to TINACloud to edit the examples or create your own circuits
In the previous chapter, we’ve seen that the use of Kirchhoff’s laws for AC circuit analysis not only results in many equations (as too with DC circuits), but also (due to the use of complex numbers) doubles the number of unknowns. To reduce the number of equations and unknowns there are two other methods we can use: the node potential and the mesh (loop) current methods. The only difference from DC circuits is that in the AC case, we have to work with complex impedances (or admittances) for the passive elements and complex peak or effective (rms) values for the voltages and currents.
In this chapter we will demonstrate these methods by two examples.
Let’s first demonstrate the use of the node potentials method.
Example 1
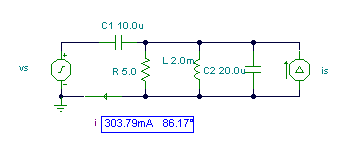
Find the amplitude and phase angle of the current i(t) if R = 5 ohm; L = 2 mH; C1 = 10 mF; C2 = 20 mF; f = 1 kHz; vS(t) = 10 cos wt V and iS(t) = cos wt A
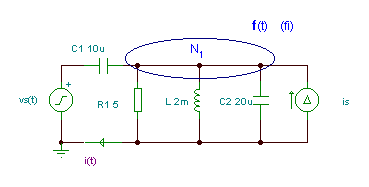
Here we have only one independent node, N1 with an unknown potential: j = vR = vL = vC2 = vIS . The best method is the node potential method.
The node equation:

Express jM from the equation:


Now we can calculate IM (the complex amplitude of the current i(t)):
 A
A
The time function of the current:
i(t) = 0.3038 cos (wt + 86.3°) A
Using TINA
om:=2000*pi;
V:=10;
Is:=1;
Sys fi
(fi-V)*j*om*C1+fi*j*om*C2+fi/j/om/L+fi/R1-Is=0
end;
I:=(V-fi)*j*om*C1;
abs(I)=[303.7892m]
radtodeg(arc(I))=[86.1709]
import sympy as s,math as m,cmath as c
cp= lambda Z : “{:.4f}”.format(Z)
Replus= lambda R1, R2 : R1*R2/(R1+R2)
om=2000*c.pi
V=10
Is=1
#We have an equation that we want to solve
#for fi:
#(fi-V)*j*om*C1+fi*j*om*C2+fi/j/om/L+fi/R1-Is=0
fi=s.symbols(‘fi’)
sol=s.solve([(fi-V)*1j*om*C1+fi*1j*om*C2+fi/1j/om/L+fi/R1-Is],[fi])
fi= [complex(Z) for Z in sol.values()][0]
I=(V-fi)*1j*om*C1
print(“abs(I)=”,cp(abs(I)))
print(“degrees(phase(I))”,cp(m.degrees(c.phase(I))))
Now an example of the mesh current method
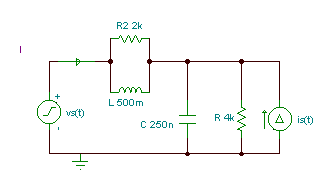
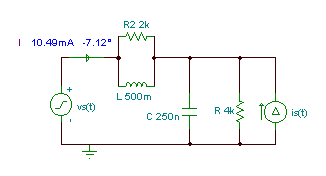
Find the current of the voltage generator V = 10 V, f = 1 kHz, R = 4 kohm, R2 = 2 kohm, C = 250 nF, L = 0.5 H, I = 10 mA, vS(t) = V cosw t, iS(t) = I sinw t
Although we could again use the method of node potential with only one unknown, we will demonstrate the solution with the mesh current method.
Let’s first calculate the equivalent impedances of R2,L (Z1) and R,C (Z2) to simplify the work:  and
and

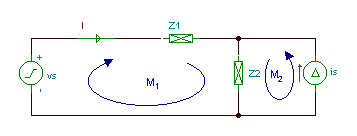
We have two independent meshes (loops).The first is: vS, Z1 and Z2 and the second: iS and Z2. The direction of the mesh currents are: I1 clockwise, I2 counterclockwise.
The two mesh equations are: VS = J1*(Z1 + Z2) + J2*Z2 J2 = Is
You must use complex values for all the impedances, voltages and currents.
The two sources are: VS = 10 V; IS = -j*0.01 A.
We calculate the voltage in volts and the impedance in kohm so we get the current in mA.
Hence:

j1(t) = 10.5 cos (w×t -7.1°) mA
Solution by TINA:
Vs:=10;
Is:=-j*0.01;
om:=2000*pi;
Z1:=R2*j*om*L/(R2+j*om*L);
Z2:=R/(1+j*om*R*C);
Sys I
Vs=I*(Z1+Z2)+Is*Z2
end;
I=[10.406m-1.3003m*j]
abs(I)=[10.487m]
radtodeg(arc(I))=[-7.1224]
import sympy as s,math as m,cmath as c
cp= lambda Z : “{:.4f}”.format(Z)
Vs=10
Is=-1j*0.01
om=2000*c.pi
Z1=R2*1j*om*L/(R2+1j*om*L)
Z2=R/(1+1j*om*R*C)
#We have an equation that we want to solve
#for I:
#Vs=I*(Z1+Z2)+Is*Z2
I=s.symbols(‘I’)
sol=s.solve([I*(Z1+Z2)+Is*Z2-Vs],[I])
I=[complex(Z) for Z in sol.values()][0]
print(“I=”,cp(I))
print(“abs(I)=”,cp(abs(I)))
print(“degrees(phase(I))=”,cp(m.degrees(c.phase(I))))
Finally, let’s check the results using TINA.